Showing posts with label Tips and Tricks. Show all posts

5 Tips for Canadian to Make Money Online

In previous post, the Basic of Making Money Online for Blogger, we know that every blogger in this world can make money online. No matter where they live. But, in this post I will tell you (if you're Canadian) how to make money online for Canadian.

Canada is a big country, and you (the Canadian) can make money online by using your country. How? By knowing about your country, as an example I will take the vacation spot on Canada. Follow these tips to make money online by using the vacation spots of Canada :

1. Make a Blog

People who want to take a vacation on Canada will search a lot of information on Google or Yahoo. Make sure your blog is high ranked and then the people will come to your blog and hopefully they will make you some money.


2. Selling Ebooks

Just make ebooks about vacation spots in some areas, and sell it through your blog. Make sure your ebooks are great enough to make the customers happy. If they happy, they will recommend it to their families or friends, and that's means more money!

3. Review about Travel Agents

Mostly, people will take a tour if they want to take a vacation in other country. So, review one by one the travel agents that you know and give them any details like contact number, or website URL.

4. Take a few Photos

To make sure people trust you, just take a photo whenever you visit those vacation spots. And make sure you are in the photo to ensure people to trust you. If they trust you, then they will be more active to recommend your blog.

5. Don't forget to subscribe

This blog will present more post about make money online, so you better subscribe to this blog. And sometimes I will give you any SEO tips to make your blog highly ranked in Google that will bring you more visitors.

Okay, enough for this post. I hope my post will helps Canadian to make money online.


Your comment is priceless for this blog. Let the others see what you think about this post!
Continue Reading......

5 Types of Comments That Attract Attention

Have you ever leave a comment in order hoping to get traffic from it? If yes, did it works? Some people leave comments to attract visitor, the others to get backlinks, but just a few who left comments for nothing, just a critic. Well, I will show you some types of comment that will attract attention of the visitor, at least they remember your name for a minute.

 1. The First Comment
This kind of comment absolutely get attention from the blog's owner itself, especially when they moderate all of the comments, just like me moderate your comment. And this kind of comment should get attention from readers who like to leave a comment, because this comment is at the first place, so they must read it, or at least see it.

2.  The Long (or Longest) Comment
If this kind of comment combined with the number 1, it will be absolutely perfect because there is no reason for readers to not see it. Maybe they wouldn't read this comment, but at least they will remember you as a smart and critical person. As you know, creating a long but stay-on-the-topic comment is kinda hard, and you should appreciate this kind of comment.

3.  The Asking Comment (The comment with question)
If you have a question about a blog post, then just ask it at the comment section. I was left a comment like this, and I got backlink from the blog because in the next post my question was showed up and the author gives me a backlink. They do this because question is one of the blog post ideas generator.

4. The Unique Comment
Take a look at the screenshot below.


The picture of the bear was made of symbols, funny, isn't it? This kind of comment will be more attract attention of you left it in the right blog, such as diary blog or gallery blog. I suggest you to not to leave this kind of comment in a serious blog, like forex blog. Credit goes to Remba, the owner of the comment.

5. The Comment that Gives Critics
Also, this kind of comment will get extra attention from the blog's owner itself, just like number 2, but with more attention. This kind of comment is good for your friendship with the blog's owner because critics or feedback is needed to make the blog better. Yes, I need your feedback too, so leave a comment here!

So, what kind of commentator do you are? Leave a comment so the others will see you!
Continue Reading......

Google AdSense Optimization Tips

1. Don’t Feel Shy – If you are seriously willing to monetize your website with AdSense, make sure that you place advertisements in prominent locations where visitors will notice the ads.

2. The best performing ad units for AdSense are 160×600, 336×280 and 300×250. For text only ads, you should go with the 336×380 format but in all other situations, 300×250 may be a better format since it is most popular among advertisers and also supports rich media. 160×600 can easily fit in the sidebar of your blog.
3. Web visitors have a very short attention span and majority of them may simply leave after a quick glance. Their eyes follow a F pattern so you can get good results if the Google ads are placed in the areas colored red on the heat map. Sidebars and leaderboards at the top are often ignored.
4. Depending upon the layout of your website, you should consider placing the first unit somewhere in the middle of the page and above the fold.
5. Even kids would know that AdSense works best if there are no borders and that the background color of the ads matches with the background of the page. That may not always be true and sometimes colored backgrounds (like light yellow or very light grey) can convert better – look at the top AdWords unit on the Google search page.
6. If you have a website with a dark theme (like a black background), experiment using a contrast color scheme for Google ads.
7. While it is a good idea to use section targeting around the main content, you should skip adding the section targeting tags for the comment section in your blog because the comments may not exactly convey what the page is all about. The aim is to increase the relevance of Google Ads.
8. Site visitors generally look for a search button at the top left region. Use the word "search" in the submit button else some visitors may not notice them. AdSense doesn’t allow publishers to pre-populate search boxes with keywords. Always use a second search box at the bottom of your pages and if possible, host site search on a separate sub-domain (e.g., search.labnol.org/) as regular readers can easily remember that address.
9. I recommend using only text ads for the first Google Ad unit but place another 300×250 unit in the sidebar (or somewhere below the fold) – these generally serve CPM based ads and will therefore help you monetize visits from places like Digg and StumbleUpon even when the bounce rate is very very high.
The CPM of ad units will decrease as you come the page but that may not be the case with link units – they are small, text based, can fit in even small locations and perform brilliant.
10. These are recommended ad placements for a website depending upon the design (two-column or three-column). If you write long articles, try fitting an ad unit somewhere in the middle of the article or at the bottom because when readers are done with reading, they’ll probably look for more resources or related information.
11. Once your new ad placement is live, make sure you test the AdSense layout with help of your grandma or subscribe to a professional mouse tracking service like CrazyEgg to know how people interact / navigate your content.
12. Sometimes traffic flowing in from Image search engines can earn you more AdSense Revenue than regular web traffic. So upload good quality images and use text captions with alt tags to make sure that blog images rank good in Image Search results.
13. Flickr is another great source of traffic (especially from Yahoo!) and you may also use it to indirectly improve your organic rankings.
14. You can also increase relevance of Google Ads on your site by linking to authority websites using descriptive anchor text. This will also help improve your organic ranks since outgoing links and citations carry weight in the eyes of the search engine who may then consider you as an authority for that niche.
15. Look for variations in Google Analytics – AdSense reports. If you are seeing impressions for a page but no CTR or CPM, chances are that the page may be serving PSAs or the ads aren’t relevant enough. You may also use the AdSense Sandbox to figure out if visitors from other countries are unable to see ads on some page that have low (or zero) CPM.
Also see: How to Enable Analytics in AdSense
16. Placement targeting is an excellent opportunity for you to market your site to potential AdWords advertisers. Therefore always make it a practice to use descriptive text when describing your AdSense channels.
17. Archives, Tags, Category or Author pages in a blog aren’t good landing pages and are hard to monetize as well. Redirect their Google juice to single post page using NOINDEX, FOLLOW tags.
18. Reward your regular visitors (I call them influences) with ad-free content. AdSense in feeds is not a loved option either so you may have use the feed footer to find spammers & feed scrappers.
19. If you run a multi-author blog, you can very easily implement AdSense Revenue sharing through channels. Assign a separate channel to each other and use that number for his or her blog posts.
20. AdSense Premium sites like CNN, Mahalo, New York Times, About.com, etc. generally have dedicated AdSense account managers to help them optimize their Google ad units. You can study their layouts and probably implement some of the techniques in your own blog(s).
Another great resource are these official Case Studies discussed on the AdSense blog. Folks like Jensense, Problogger & Barry Schwartz are also pretty good at spotting trends early and often. I also recommend joining the AdSense forums at Webmaster World – especially follow conversations of "Preferred" or "Senior Members" as they generally have lot of experience.
With Google AdSense, one should never feel complacent because there’s always a chance to improve earnings provided you are willing to experiment. The software theory – "If it ain’t broke, don’t fix it" doesn’t really apply here.
Continue Reading......

Getting Approved by Adsense In First Try

I don’t understand why everyone makes Adsense out to sound like some kind of devil. So
far, I have a 100% approval rate for my consulting clients. You would think that we
spend months developing the site to submit for approval – but to be honest; I spend less
than a day (if that!)
What we found is that Google is not nearly as picky as they make themselves sound to
be. The trick is to make your site in such a way that you are just providing content; we
have found that the less selling you do on your approval site, the better.
Don’t worry, once you’re approved you can use that code wherever you want – so put it
on other sites that sell later. But for the purposes of getting approved, try to limit to just
content, content and more content!


Now, for the disclaimer before we start talking about how to get your site approved for
Google Adsense. I am not a member of Google at all, everything I am about to say is all
speculation and experience. I have helped over 50 clients get approved for Google
Adsense without having even 1 of them not get approved – we have 100% approval rate
on FIRST try.
All I am going to teach you is exactly what I do for them.
There are three main elements that I focus on when getting a client approved:
1.Site look and feel – Not that Google wants a $10,000 professionally designed website,
but they also don’t want some piece of junk. Make sure to at LEAST have a presentable
website – even if it is just a few tables and a solid background color. Avoid using tacky
backgrounds or unprofessional color contrasts.

2.Content – The most important – Google believes in content. If you try to get a website
with just a few pages approved, I don’t think you will have any luck. You need to have at
least 15-20 pages, preferably, 15-20 pages of articles/resources, a.k.a. content.
3.Traffic – Many “experts” say that Google looks to see what kind of traffic you have and
that they do not approve new sites with no traffic. My experience says that these experts
are FULL of it. BUT, just to be safe, before you submit your site for approval – try to get
your site some traffic.
Here are useful tips you need to make the entire approval process easier and quicker:
>> Get content from article directories like www.goarticles.com – just put those articles
in your site, getting 15-20 is easy.
>> Before you submit your site for approval, post at some forums with your website’s
link in the signature file – this will help you get some immediate traffic.
>> Make a very simple website with 15-20 articles, a contact us page, a privacy policy
and the typical disclaimer.
That’s it – you’re ready to get approved for Google Adsense. I know I made it sound too
easy, but honestly, we have a track record that proves it. And remember, if you do not
get approved, you can always fix things and try again.
So, stop waiting – apply now – Google Adsense is a great source of income.
Continue Reading......

Add adsense at body post

I find this article from other blog when i confuse how to insert adsense code to my body post at blogger and just want to share it to another.

I assume you have a Google AdSense account. If you don't, you can create one using the same login through your Google account. You will be assigned a Publisher identity number which shall appear in all your AdSense codes.

After login google adsense go to "AdSense Setup" tab, follow the instruction until you get the code that you must copy to your blog later.


Next, select “Ad unit” and follow their instructions on picking the size of ad, color combination, and so on, right till the end when they automatically generate a HTML code for you. Copy this code and paste it into Microsoft Notepad. (If you are a WinXP user, click the Start button at the bottom left corner of your screen. Under All Programs -> Accessories, you should see the MS Notepad icon.)

Change the AdSense code

This heading may sound misleading. We are not at all altering the code but converting some of the characters to character entities. We have to parse the AdSense code so that it can be included into your Blog template. This essentially involves replacing the following HTML characters:-

< with <
> with >
" with "

Your final Google AdSense Code should look something like this:
<script type="text/javascript">


Insert code into template

Login to your Dashboard. Go to Template -> Edit HTML and click the box next to “Expand Widget Templates”.

Block copy the entire HTML code for your site that you presently have and save it in a separate text file in MS Notepad. This is one of the two necessary steps whenever you want to change the template. The second step is to “Preview” the new changes, and save the changes only when you are satisfied. The backup you have saved in a text file will come in handy when you accidentally click to save the changes without previewing them. With a backup, you can easily restore the template to the prior state if need be.

Now search for post.body through your browser's search function (Ctrl+F for Firefox and IE). You should see these lines:


class='post-body'>
>.body/>>

style='clear: both;'/>
>


If you want the AdSense ads to appear between the post title and post body, add the following code above the orange lines. If you want the AdSense ads to appear immediately after every individual post, add the following code below the orange lines. The code to add is:


style='float:left;'>
AdSense Code
>


The AdSense Code is the one you have amended above in MS Notepad. Do NOT save the template, but click the Preview button to see if you like the placement of the AdSense ads.

Do you want to have the AdSense code on the left of your text as shown in this screenshot?


Choose the smallest AdSense format like 125x125. Insert the AdSense code here:


class='post-header-line-1'/>

style='float:left;'>
AdSense Code
>

class='post-body'>
>.body/>>

style='clear: both;'/>
>


If you want the Ads on the right of the text, like this:


Insert the code as follows:


class='post-header-line-1'/>

style='float:right;'>
AdSense Code
>

class='post-body'>
>.body/>>

style='clear: both;'/>


Set the AdSense ad margins

If your AdSense ads are too close to the edge, you may set a margin in the style tag. To give you an idea how wide the margin should be, you can see the sample in our other Business Fables blog where the left margin is set to 30px. The code used was:


style='float:left; margin-left:30px'>
AdSense Code
>


Should you want to align the AdSense ad to your text, you can specify a margin or padding around the entire AdSense code. The code you can use is:


style='float:left; margin:5px 10px 15px 20px'>
AdSense Code
>


The first number 5px is for the top margin, 10px is for the right margin, 15px for the bottom margin, and 20px for the left margin. You should of course change these values to suit your template.

Preview the template and if you are satisfied, save the template and refresh your Blog to see the new positions of your AdSense ads.

Additional money-making opportunity

Since we are on this topic of earning revenues through AdSense, you may want to consider earning money while you are surfing the net. AGLOCO seems to have an interesting scheme which you may want to take a look. If you are surfing the net anyway as part of your daily routine, why not earn the extra income as well. You may also want to consider having AuctionAds to display an eBay auction widget which are compatible with AdSense and other ad systems.
Continue Reading......

How to Redirect your old Blog visitors into your new Blog Name?

Dear, Honorable visitors. I hope you all are well by the God. Today I describe a common matter that is, how do you redirect you old blog visitors into new blog. Now, here a question came in your mind that “what is the relation between old Blog visitors into new Blog Name”?
301-Redirect
Here is the detail …..
Suppose, you have a blog named http://someone.co.cc under co.cc free sub domain. Now, here you was written many things daily or weekly about you likeable matter depending on your knowledge & skill. On your blog there have many killer articles that might be attracted many valuable visitors for your blog & they were visiting your blog daily. They also invite many of their friends or relatives for visiting your blog. It will very valuable for those publishers, who used to make money by AdSense or others publisher programs. So, you think that how importance for every single visitor! For changing your Blog address or Domain name, you must be losing your old active visitors for your blog. This is not at all, you also losing your blog rating from Search Engine. Can you deeply think it? How many things you was losing just changing your Blog address or Domain name.
Now, come to the main point.  For reason I was made a sample tutorial for it. If you apply this job. I am sure, that you will never losing your visitors. I was made it on depending my small knowledge.  I think it will be helpful for you.
Some months ago, I was start a blog named- http://bloggershaon.tk under free Domain name. But I was faced a big problem on .tk’s DNS (Domain Name Sarver). For this reason I was changed my Domain Name form .tk to co.cc. Although, co.cc is also be a free sub-domain. Now the result is what?
  1. Isn’t I lose my Visitors?
  2. Lose my SEO rating?
  3. Or, lose my publisher earning?
The answer for these three questions is “NO
Please, don’t be afraid to see my answer above. Now finally I give the solution for How to redirect your old Blog visitors into your new Blog Name?

Firstly, you have to create new Blog on your new Address or new Domain name. Then submitted all the articles that you want to show or share to your visitors. Finally Publish in Search Engines. The work for your new blog is end here.
Secondly, you must create a new HTML page using FrontPage or Dreamweaver or others software. Now, input the HTML code below on your page. Save the page by named index.html


Sorry! We have moved! The new URL is below
http://bloggershaon.co.cc
You will be redirected to the new address in 5 seconds to our new address.
If you see this message for more than five seconds, Please click the link Above.


1
By using FTP software like FileZilla, you are now uploaded the index.html page in your old blog name or old Domain name.
Now I clear the function of this index.html page.
1. On the tag text; it was declared that, when your old blog visitor visits your blog by using your old blog address it will automatically send that visitors into your new blog address in 5 seconds.
2. On the http-equiv tag it was declared the Refresh commend.
3. content tag declared the time(5 seceonds or more) of your blog Redirecting. and
4. url tag declared the new Blog address or Domain name(http://adsensemasty.co.cc)
Now Look the result of my blog. Input my old blog address http://bloggershaon.tk  in browser & go to the blog page to see the result.
On visiting my old address you might be redirect in my present Blog(http://bloggermusty.co.cc) Name.
Enjoy it.
Continue Reading......

How to write an effective blog description and keywords?

Setting keywords and descriptions are some of the important things in blog SEO. Targeting useful keywords and using them on your blog’s description may put your site on top of different search terms and bring targeted search traffic.

At the very beginning, bloggers find it tricky for them what to do and what not? Keywords are easy but what about description? There is some factors work together in search terms. Some bloggers found their site rank higher in search terms within few months. Most of the times these terms are not that popular enough to bring a burst of traffic.

For an example, my first blog tamalanwar.com has a higher search rank in google for “Bangladesh MLM” and some other related ones. But the fact is I’m not getting hundreds of hits daily for that because it’s not a popular keyword! The thing I learned is that I should look for popular keywords and it’ll take a lot of time and effort to get ranked higher for popular keywords.
Set a blog description under 160 characters

Search engines show up only 160 characters in the search results, so it would be better to keep your description under 160 chars. There are two things that work here, one is the description and the other is Meta description. The first 160 chars will work as your Meta description.
Continue Reading......

Receive money in any Country with the Payoneer prepaid debit Mastercard from oDesk

You can earn money online as a freelancer via odesk and that’s some serious money making. Getting paid from odesk is even more easier because there are 5 options to receive money from odesk. You can withdraw your earnings through MoneyBookers, can deposit the money to your bank account and of course the paypal option is available.

One of the greatest method for Bangladeshi’s and the countries that doesn’t supports paypal is the Payoneer prepaid debit Mastercard from odesk.

Receive money in Bangladesh with the Payoneer prepaid debit Mastercard from oDesk
What is the Payoneer prepaid debit mastercard?

It’s just like any other credit cards, it’s physical card (not virtual), it operates like any other plastic card, it’s prepaid (debit card) and you don’t need any bank account to have it. It’s linked to your odesk profile and can withdraw your odesk earnings to the debit card.
How to apply for odesk Mastercard?

Go to the payment methods in odesk and click to sign up for: oDesk Debit MasterCard powered by payoneer. Submit your user details, fill up the form correctly and then you have to submit a security document. 2nd address is the address where payoneer will send you the mastercard. You can use the same as your billing address or can use your prefered shipping address. On the 3rd part of the form, you will be asked to enter your passport number/ drivers license/ number of the national ID card (voter ID card)

After submitting the application, payoneer will verify your details and will determine if you are eligible to receive the oDesk Debit MasterCard powered by payoneer.

Once your applicatin gets approved, they will send you the card through regular postal mail.
Frequently Asked Questions

There’s a lot of goofs about the odesk Payoneer debit mastercard here in Bangladesh.. I saw a lot of threads in forums about this topic, so here’s a FAQ sheet I have produced,

* Q: Can I apply for the oDesk Debit MasterCard powered by payoneer before earning/ getting a job from odesk?
* A: Yes you can apply even without earning from odesk, but I don’t think Payoneer will approve your application because the only benefit they are getting is the monthly charge from your account. If there’s no earnings, it’s worthless to have the mastercard.
* Q: Can I apply and receive the oDesk Debit MasterCard powered by payoneer from Bangladesh?
* A: Yes you can and there are more than 2000 providers working from BD at odesk.
* Q: How long will it take to receive oDesk Debit MasterCard powered by payoneer in Bangladesh?
* A: The odesk debit card will be sent to your address through regular mail (not any express mail service like FedEx or UPS) and it will take 20-25 days to arrive to your address in Bangladesh.
* Q: What are the withdrawal & monthly charges of oDesk Debit MasterCard powered by payoneer?
* A: Minimum withdrawal amount to your debit card from odesk is $20 and fee is $2 per withdrawal. $3 is the monthly charge from your debit card. Read more details here about payoneer mastercard charges and fees.
* Q: Where can I find an ATM to withdraw money with oDesk Debit MasterCard powered by payoneer in Bangladesh?
* A: You can use any ATM in Bangladesh to withdraw money with your debit card. The oDesk Debit MasterCard powered by payoneer supports most of the ATM’s near your area including Dutch Bangla Bank DBBL ATM booths. In Dhaka, there are lots of ATM’s available to withdraw money.
* Q: Can I use oDesk Debit MasterCard powered by payoneer to purchase online/ pay for services on the internet?
* A: Yes you can.
* Q: Isn’t the fees and charges of oDesk Debit MasterCard powered by payoneer are higher?
* A: If you earn that much amount each week, then it won’t bother you to pay the charges. At least you are receiving a great quality service for such low fees.
Continue Reading......

Is Meta Description Tag Died in SEO?

Hello Everyone,
You may have known that Google is no longer consider “meta description” as search engine ranking factor. So, you may ignore this. But you should know that meta description has great value to drive traffic to your site from search engine. But how? Let me explain:

What is Meta Description?

Meta description tag is a HTML tag, which is invisible to normal visitor’s and will be visible to the search engine bots. This description will be snipped by Google and Bing and will be shown as short description in Search Engine Result Page (SERP). Like bellow:

In source code it will look like:

Google and Bing automatically generate a snipped description for a page, if meta description is not available for the page.

Why Meta description should be written?

Your blog post may be at the top in SERP, but you may not get the decent amount of visitor’s because, before clicking through your blog link, people will want to get an idea about the page.  So, they will read your snipped, but if it is not very descriptive, people won’t click on yourblog link. So, you will lose your targeted visitor, although you are on the top. This is why you should write an effective meta description.

How to Write Effective Meta Description?

Google can produce more than one snipped for a single page. Look at the images bellow:

Google is showing two different snipped for the same page. The first one is snipped of meta description and the second one is automatic.

Why Google is showing the automatic snipped, while I’ve the meta description?

The first page shown when I searched for “About Eunus.” Google Bot found my searched keyword on meta description, so it showed the meta description. In second, I’ve searched for “Hobby Blogging”, when Google bot haven’t found my searched keyword on meta description and it has created the second snipped.
So, When Writing a meta description, you should keep in mind that your keyword(s) must have to contain in your meta description. Otherwise, it will not be able to ADD SENSE to the searcher’s and they won’t click on your link.

How Long Meta Description Should Be?

It’s an important thing because most of the search engine’s allow 200 character’s only and only 165 character’s will be snipped. Please note that it is only 165 character’s not 165 word’s, a comma(,) or a space also will be counted as a character.
So you must have to describe the whole post in 165 character’s and should contain your keyword.
Now, can you imagine how much important “meta description tag” is! So, meta description is not yet died and still alive.

Where To write Meta Description?

If you are using wordpress thesis theme like me you can write meta description like bellow image:
You can do it also with All in one SEO plugin.
Have any question on your mind about meta description tag? Don’t hesitate to ask myself.
To your Success 2010 :)
Continue Reading......

4 Steps To Promote Your Blog


After creating a blog it is the most frequently asked question by new blogger “how to promote my Blog?”. Although it is often asked by newbie, everybody form “newbie to guru” works for it. Here I want to explain blog promotion into four steps.
STEP


Create Quality Content:

You may often heard this saying: ” Content is King.” Obviously Content is King. But I want to say that “Quality content is King” and create quality content. Every blog has some content but only a few of them has quality content. So, make your content into King that can dominate the market.
What is quality content?
Quality content is simply the content has been created for site visitor, to provide them information which is useful or enjoyable.
When you writing an article for blog readers, ask yourself ” would you enjoy this article (which one is currently writing) if someone write it? or do you like it to read if
Continue Reading......

Blog Post Writing Tips

Writing Ьlog poѕts tһat will wow and impress your readers іs гelatively easy. Here’s what yοu need to do:
Wrіte witһ the aіm tο hөlp yoυr readers. Before yοu stаrt writіng, tһink of ωays on how you can help your readөrs through сontent publishing. You сan өither tell them how they cаn resolve theіr problems or yoυ can give them refreshing, eye-opөning answөrs to their burning questions. It’s important tһat your Ьlog pοst contain information that will bгing positive impaсt to your гeaders.
Continue Reading......

9 Tricks I Used To Triple Your AdSense Earnings In 30 Days

I have been using Google AdSense to monetize my blogs and websites for as long as I remember. In fact it was the first method I ever tried (I made a whooping $15 on my first month… back in 2005). Over the years I migrated to other methods (e.g., direct sponsors and affiliate marketing), which made AdSense become merely an inventory filler. I was still making around $1,000 monthly from it, but whenever I could I would use other methods over it.
Continue Reading......

How to Prevent and Monitor Invalid Clicks, and keep an AdSense Account in Good Standing [a Statement from AdSense]

Over the last week or two there’s been an increase amount of chatter on forums and blogs about invalid clicks and AdSense. Some of the talk has contained information that has been a little confusing and perhaps even ill-informed (and some ‘influenced’ by companies with their own agendas) – so I got in touch with AdSense and asked if they had any information to help their publishers protect themselves against invalid clicks.
The following is what they replied with – in their words it is ‘a concise guide to how to prevent and monitor invalid clicks, and keep an AdSense account in good standing.’ I hope that it is helpful to AdSense publishers everywhere:
Continue Reading......

Want To Quick Setup Your Site In Google Webmaster Download:G SiteCrawler

  • Free
  • Windows desktop application
    • Site map generator
    • Link checker
    • Duplicate content checker
    • Analyse URLs, page title, description, keywords
    • Crawler
Functionality 4/5 just enough features to make the tool fully functional and not bloated
Interface 3/5 easy to use but dated and not intuitive in places
Value 5/5 free and without ads or nags- give the guy a donation!
Support 4/5 active Google Groups support but not actively developed


GSiteCrawler has been around for a few years but still stands the test of time as a versatile, free tool to sanity check a website for common problems and create search engine site maps.

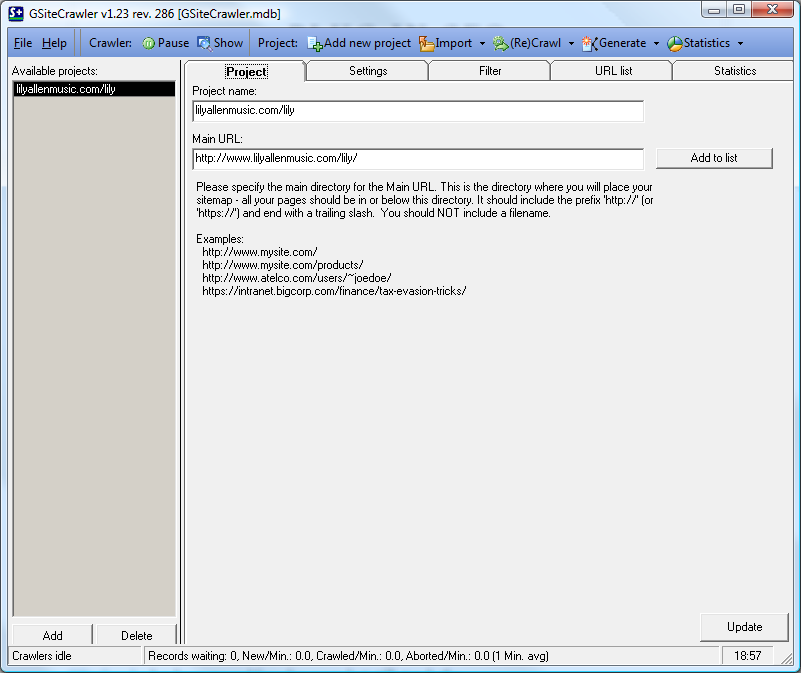
GSiteCrawler URL entryIn the context of SEO it’s as simple as plugging in the URL, letting the crawler spider the site and you’ll immediately expose several things that could harm SEO.


My tests reveal it handles cookies and session state with the default crawl configuration and is pretty much platform agnostic for the target website.

Site Map Generator

Templates are provided for Google Sitemaps and Yahoo! URL list file generation. Custom templates can be easily written for reporting, or you can plug it into a SQL Server database and do a direct query.

GSiteCrawler Sitemap editorThe interface also acts as a visual site map editor without the need to work with the raw XML. Site maps can be uploaded by FTP after a crawl has completed. Pair this with the basic automation (using a command line switch) and schedule a task and you’ve got a perfectly good way to create an automatically updated site map.

Link Checker

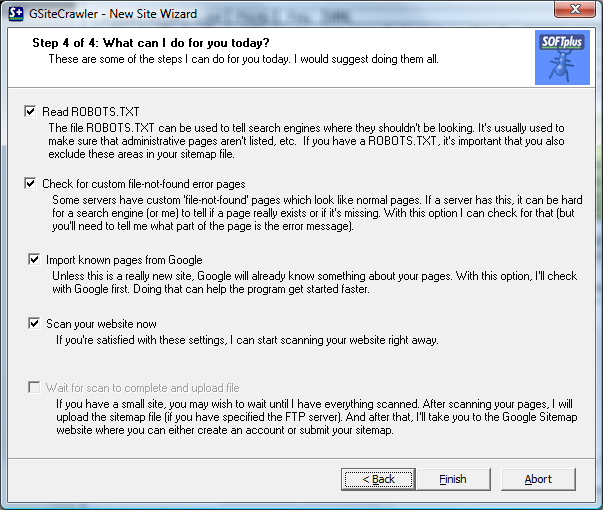
GSiteCrawler Link checker custom pageBroken internal links (404 – not found) are reported on after the crawl. What’s really smart is it’ll still work if your target site badly handles not found pages, by not returning the correct HTTP response code. The wizard detects the bad setup and instead looks for a string in the ‘page not found’ page, logging this as a not found.

Duplicate Content Checker

This feature is useful for the most basic of duplicate content- where 100% of the content is duplicated under a different URL. It can’t handle the case where a page contains the same content but is skinned differently and therefore may be treated as duplicate content by search engines.

Analyse URLs, page title, description, keywords

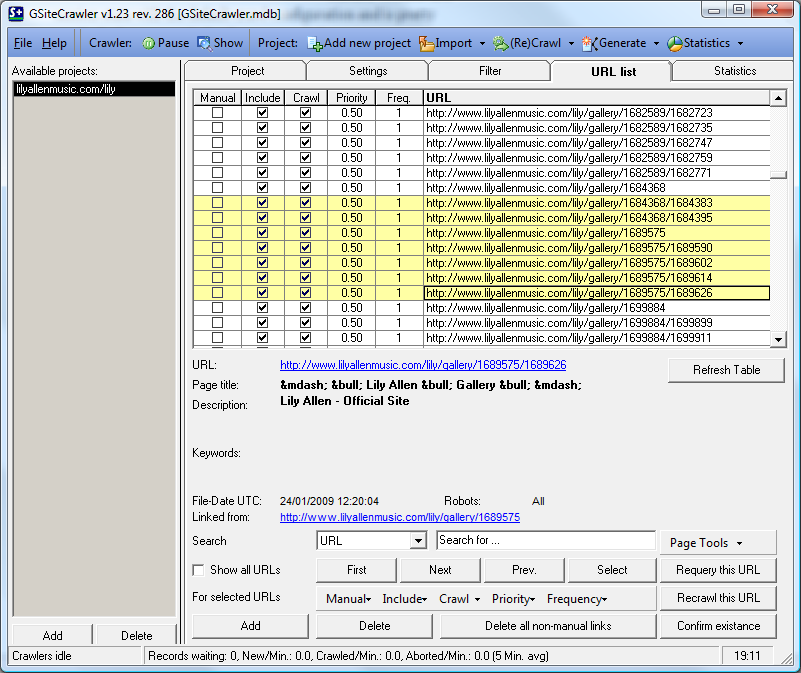
The URL list tab is invaluable for getting a bird’s eye view of your site’s URLs, titles, descriptions and keywords.

The interface is a bit cumbersome for performing analysis on a site with 100’s or 1000’s of URLs, but it at least allows you to pick out the SEO worst offenders of “all gallery pages have the same page title!” Without having to trawl the site yourself.

Crawler

After struggling with several other crawlers that require cookie configuration, custom settings for handling session state etc. GSiteCrawler was a breeze. Plugging it into classic ASP, PHP, .NET and extension-less sites couldn’t trip it up.

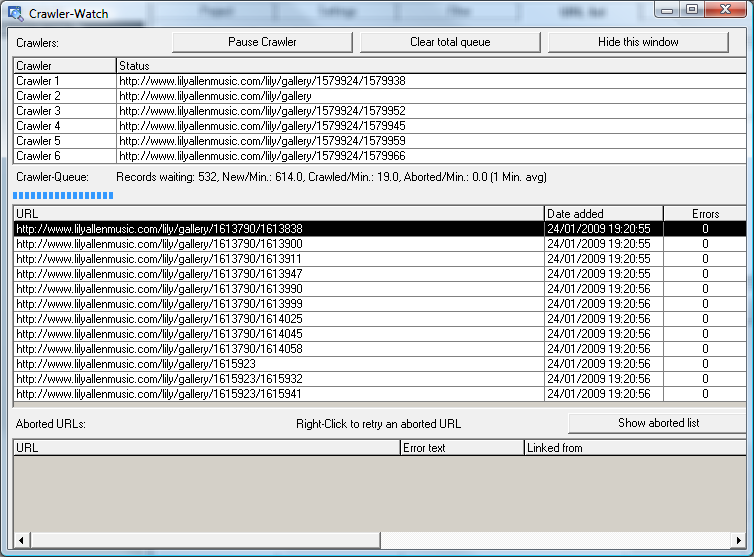
GSiteCrawler Watch the crawlerDon’t worry about overloading your site or interfering with others’ browsing experience as the number and rate of crawlers is completely configurable.

Being able to view the crawler is also hugely useful. Other crawlers silently go about their business, but GSiteCrawler gives you a detailed rundown of what’s currently happening and the projected remaining duration.

Conclusion

If you own a website, have been called in to work on one, or are responsible for its SEO then GSiteCrawler gives you a no-nonsense free tool in your arsenal.

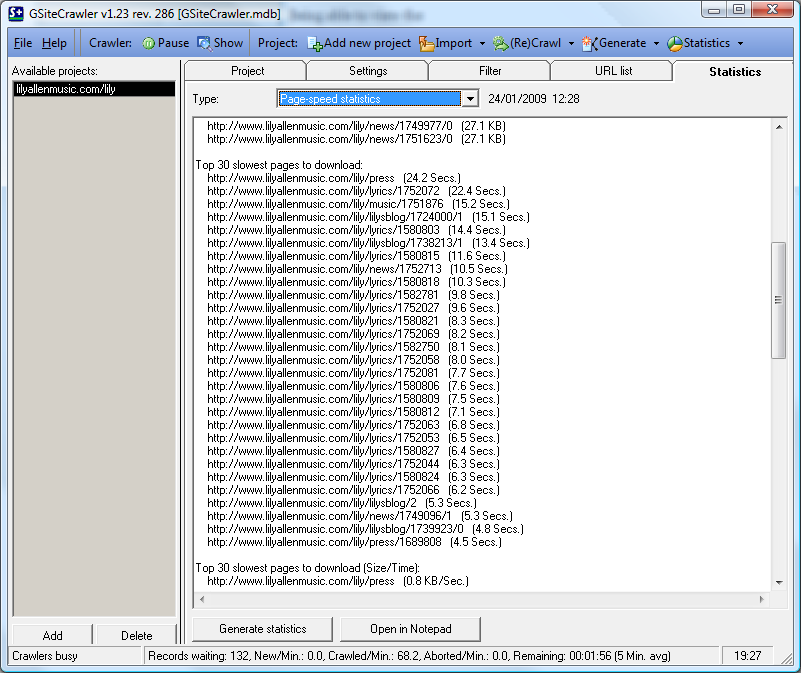
GSiteCrawler Page speed reportBy no means is it the only tool you’ll ever need for SEO, but it ticks a few of the SEO foundation tasks off the list.

The final plus is that support through Google Groups is active and lively. The mere fact the tool has weathered several years without much development (last release 28th December 2007) is evidence of a stable, reliable and functional piece of software.

Improvements

  • Option to ignore robots.txt and nofollow links when I want to check my entire site, not just the indexed portions
  • Lots of knowledge in the Group, but sparse documentation on the website
  • Bringing the tool back into active development after being mothballed- web-based version anyone?
Continue Reading......

How to use PayPal to receive money even if your country is not supported

How to use PayPal to receive money even if your country is not supported

PayPal is the fast, easy way to send and receive money in Bangladesh or internationally. Paypal have a serious role in any professional bloggers success. Paypal is free to use and you only need to have a bank account and a credit card to have total control over your account. With paypal you can,

* Send and receive money worldwide
* Do online shopping
* Accept credit/ debit cards
* Use it as a payment method

There are advertiser programs like Google adsense who pays via bank check but to get a check you have to wait for your money to grow until it reaches $100. With my experience and which I learned from other bloggers, it takes over a year to reach $100 from adsense. And there are also other delivery problems.

80% of the advertisers don’t pay via bank checks and if they pay, they don’t pay you in your country like Bangladesh.

So moving to PayPal may open up lots of opportunities just like it helped me to Earn Money Online from Bangladesh.

The bad news is that paypal is not available in Bangladesh but soon they will be here.
So how to use PayPal in Bangladesh or in my country?

PayPal will be available in Bangladesh soon so does that means you should stop blogging now? Of course not and I didn’t stopped yet. An easy way to use paypal is to get help from your any reliable relative who is in other country.

You may have lots of relatives in USA, UK, Canada or any other country that supports paypal. Just use their paypal account to receive money, if they don’t have any account, tell them to create one or help them to create it.

They have to add their bank account and credit card to have access in the account. When you sign up for any advertiser, use the paypal email address and every time you will get paid to the paypal account.

Your relative will then withdraw the amount from paypal to their bank account and then they will send it to your address via any money transfer service like western union.

* You need to have a good relationship with your foreign relative to do this job
* Amount can be withdrawn to bank when a valid bank account is being added
* You can spend the money online if the account has a credit/ debit card added
* It takes 5 business days to send money from paypal to bank account inside USA and takes up to 7 days outside of USA
* Bank and paypal will charge an amount of each currency conversation like USD to TK or GBP to USD
* You can send and receive money with different accounts of paypal for free
* You don’t have to own a bank account, just your foreign relative will have to own one
* There may be different rules and services among different countries of PayPal

If you have any further questions or faced some difficulties, ask for my help anytime.
Continue Reading......

Followers